Being a Mac user, I often use at least half a dozen different video conferencing apps including Webex, FaceTime, Zoom and Teams on my Mac. The Microsoft Teams app is something I don’t really like. The setup process is a bit convoluted especially if your email is associated with multiple projects and the Mac app will often take you to club to view the Web version of Teams.
These are just a few issues I’ve had with Microsoft Teams on Mac. There are times when I’m all set up for a meeting but the Teams app on macOS just won’t get the camera going. So I always have to use the web version. If you’re a Mac user and are dealing with these camera not working on the Teams app issues, relax. In this guide, I’ll discuss the problem and offer some ways to fix the camera not working on Microsoft Teams on Mac.
Fix Camera Not Working in Microsoft Teams on Mac
Having the camera face not working during a Teams meeting can be particularly annoying. However, the camera not working in Teams is a pretty common issue, but unfortunately, there are a plethora of reasons as to why you might face it.
One of the most common reasons the Microsoft Teams app to face the camera not working issue is that you might have accidentally disabled or forgot to give camera permission to the Teams app on your Mac. Your camera could be in use elsewhere or you might have selected the wrong camera settings within the Microsoft Teams app can also be the problem.
Bugs, glitches in the Teams app or browser and macOS-related problems also might be responsible for the issue. As you can see, there are a lot of potential culprits here. But don’t worry. In this guide, I will cover all the possible reasons and guide you through fixing the camera issue on Microsoft Teams for Mac. So, let’s cut the small talk and dig right into the solutions.
1. Leave the Meeting and Rejoin
Usually, when you join a meeting, the camera and microphone should turn on by default. If they don’t, and you’ve already tried turning on the camera in Teams to no avail, the first thing you should do is leave the meeting. It’s not the right solution for you if you’re in a meeting, obviously, but it’s faster than other possibilities.
By leaving and joining the Internet, the connection is refreshed and your camera will probably start working again. This is not specific to Microsoft Teams; it works for any video or audio conferencing app.
To leave the Microsoft Teams meeting on a Mac, press the Leave Meeting button in the upper right corner. Leave the meeting, then come back in.

2. Force Quit Microsoft Teams app and Reopen
There do appear to be a couple of wrinkles with the Mac version of Microsoft Teams. I often position my iPhone on top of my MacBook and use it as a webcam during meetings, and Teams is the only app where I have to manually select the iPhone camera every single time I want to enable video; Webex, Zoom and FaceTime all automatically recognize and use the iPhone camera when a camera is turned on. There are also instances when the continuity camera option doesn’t appear at all in the camera settings. I’ve found that I have to force quit the app then relaunch it to remove that issue so the iPhone camera shows up in the settings.
It’s worth noting that some users have also said they are having difficulty starting recording during the sessions as well as connectivity issues, with force quitting a common troubleshooting step for those problems as well.
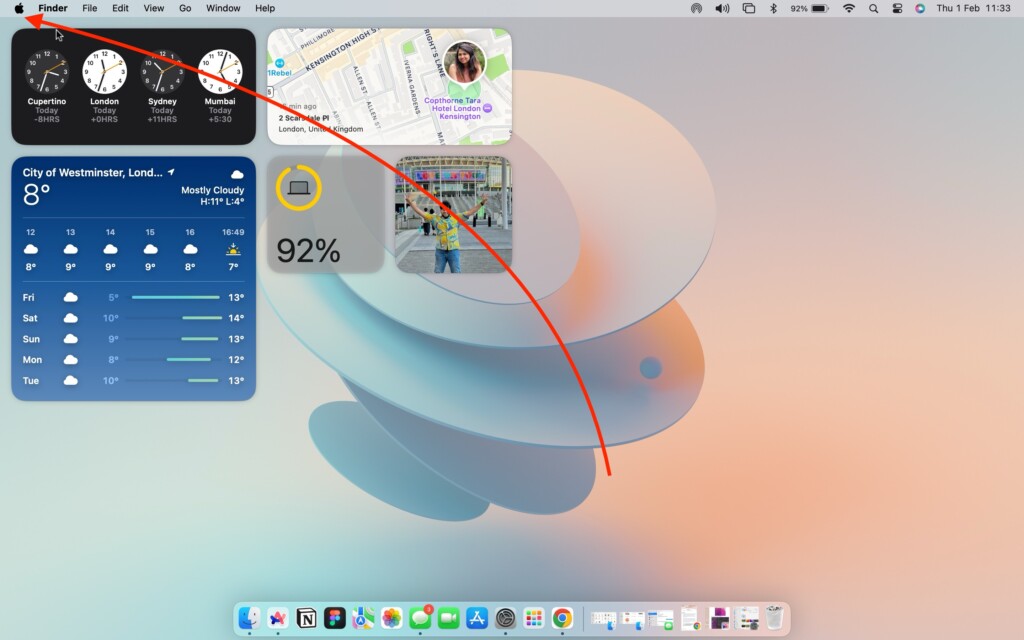
1. On your Mac, click on the Apple icon found in the top left corner of your screen.
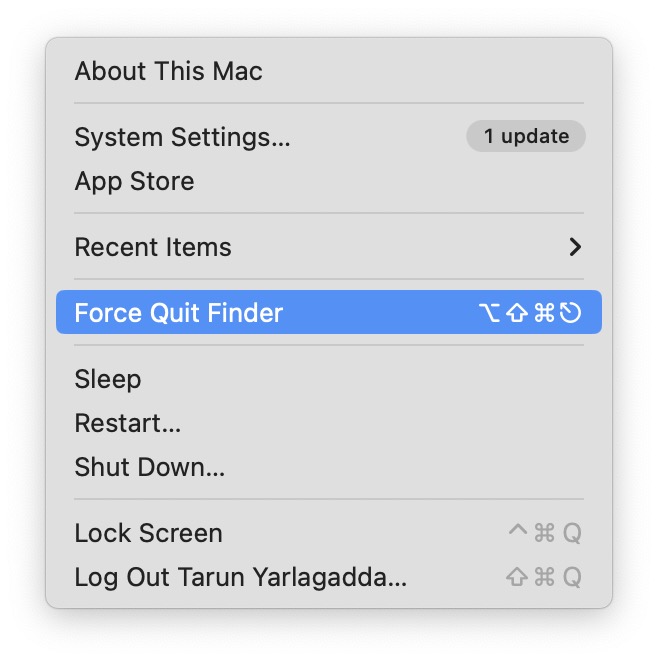
2. From here, click and open Force Quit.
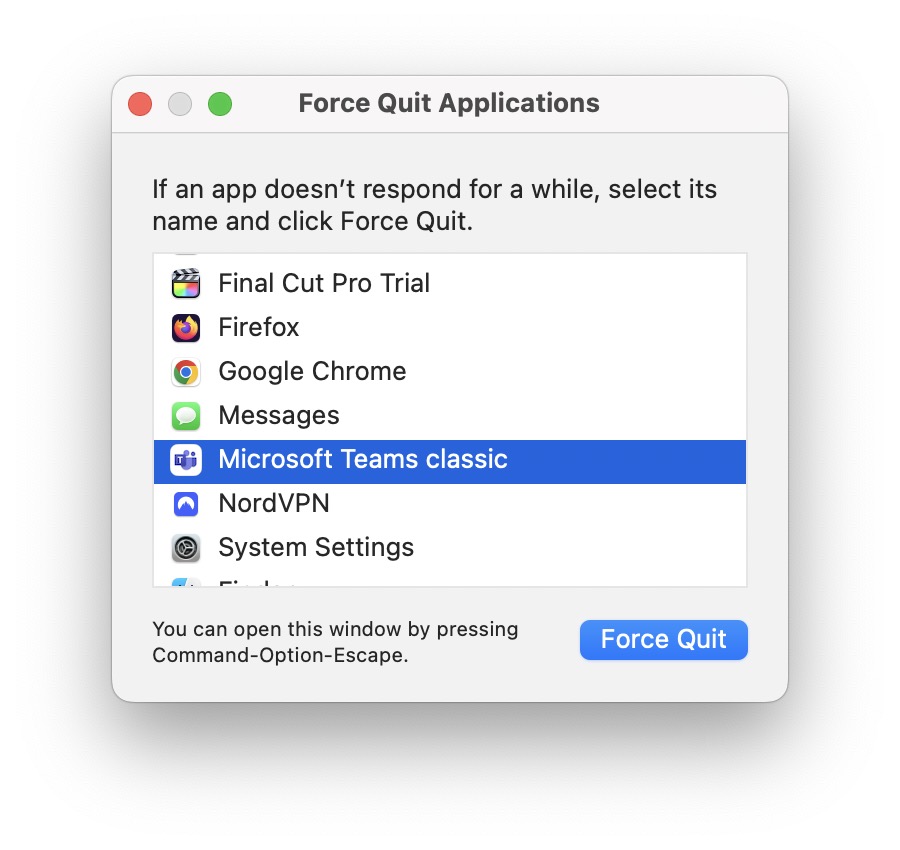
3. Now, click on the Microsoft Teams app to select and then click on the Force Quit button.
3. Select the Correct Camera
If you’re like me and you turn your iPhone into a webcam for meetings using the continuity camera feature, this might be what’s causing the problem with your camera on Microsoft Teams. The default camera setting is often the one from your last meeting in many video conferencing apps, and for example, if you used an external webcam last time, it may set that as your default camera for your next meeting automatically.
If you used your iPhone for your last Microsoft Teams meeting as a webcam, the app may still be trying to talk to it and set it as your default choice, even if your iPhone isn’t with you anymore. When that happens, you might turn on your camera in Microsoft Teams, only to not actually be visible.
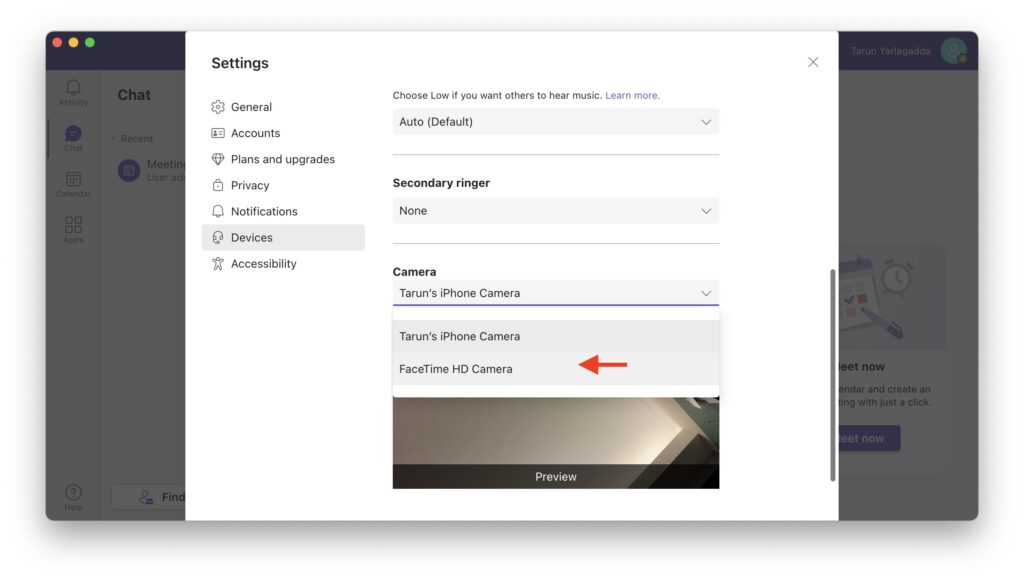
Go into the Microsoft Teams settings then and manually change the camera settings yourself so the right one is selected, and you should get back to presenting yourself properly to everybody in your next Teams meeting.
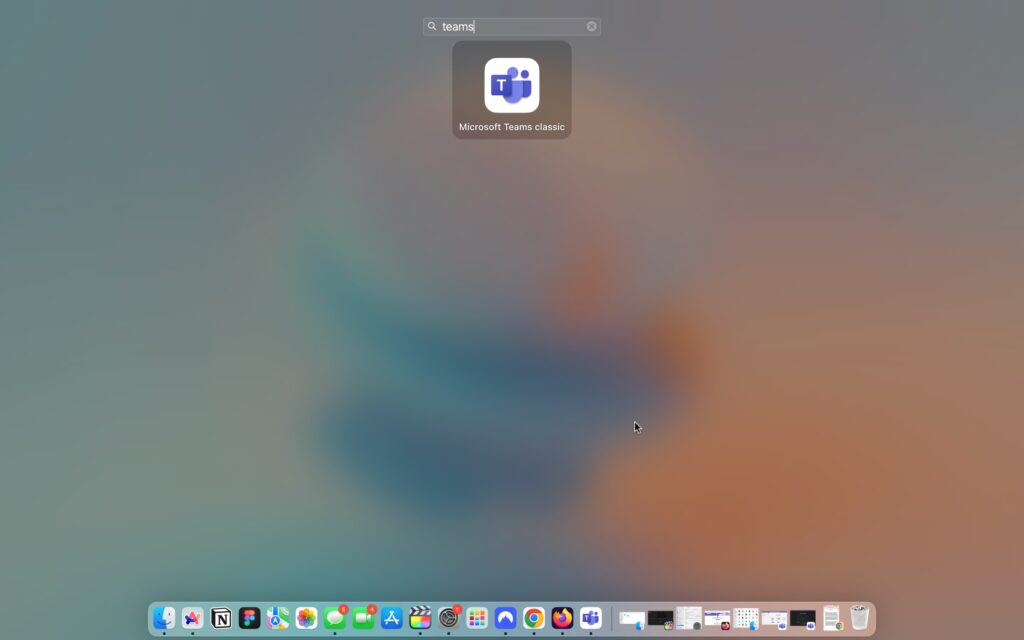
1. On your Mac, open the Microsoft Teams app.
2. Once the Webex app is open, click on Microsoft Teams from the top menu bar.
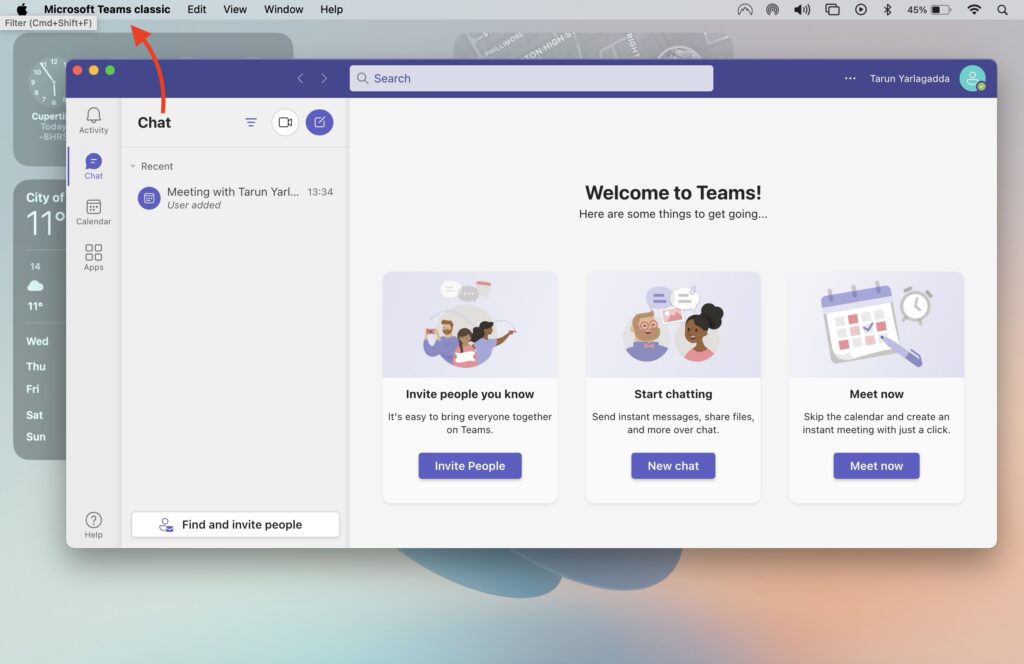
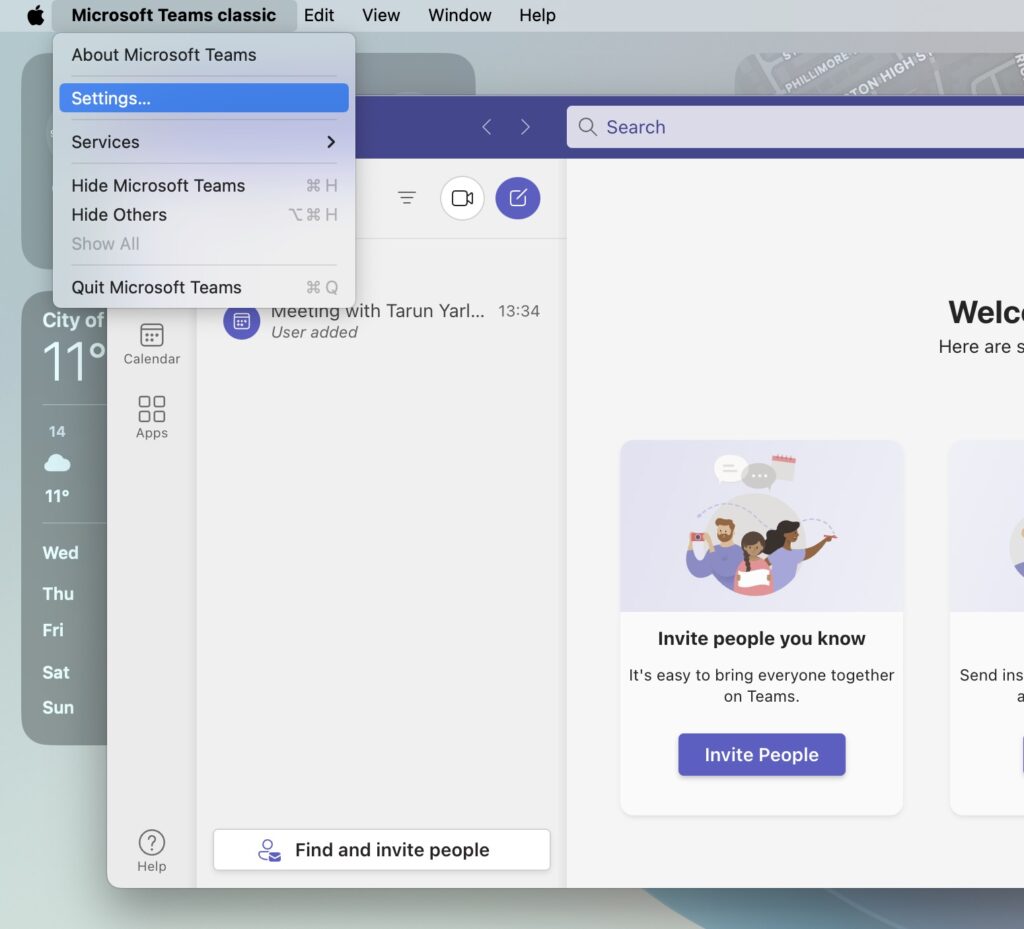
3. From here, open the Settings.
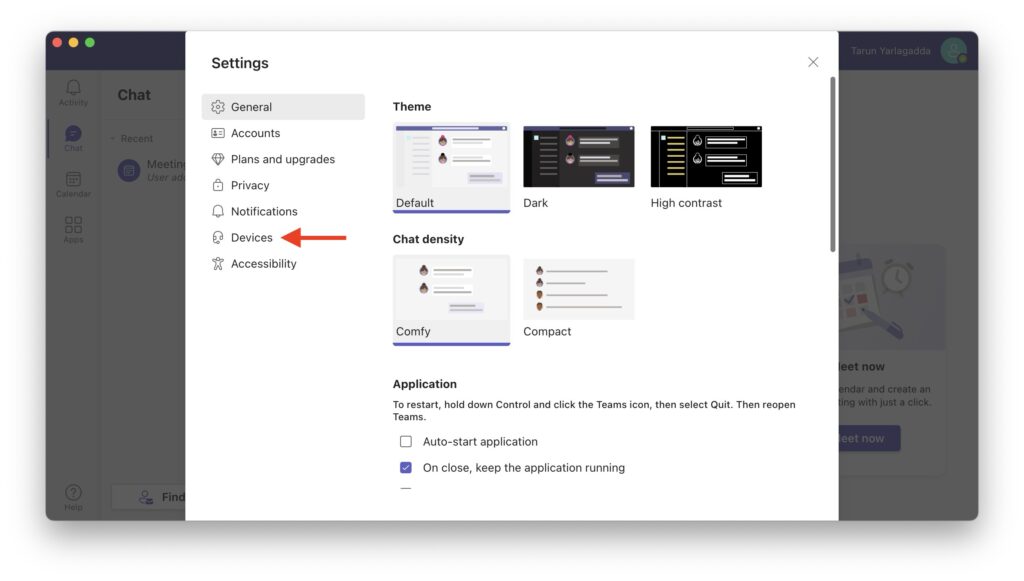
4. Next up, click and open the Devices settings from the left.
5. Now, scroll down to bottom and under the Camera settings, click on your current camera.
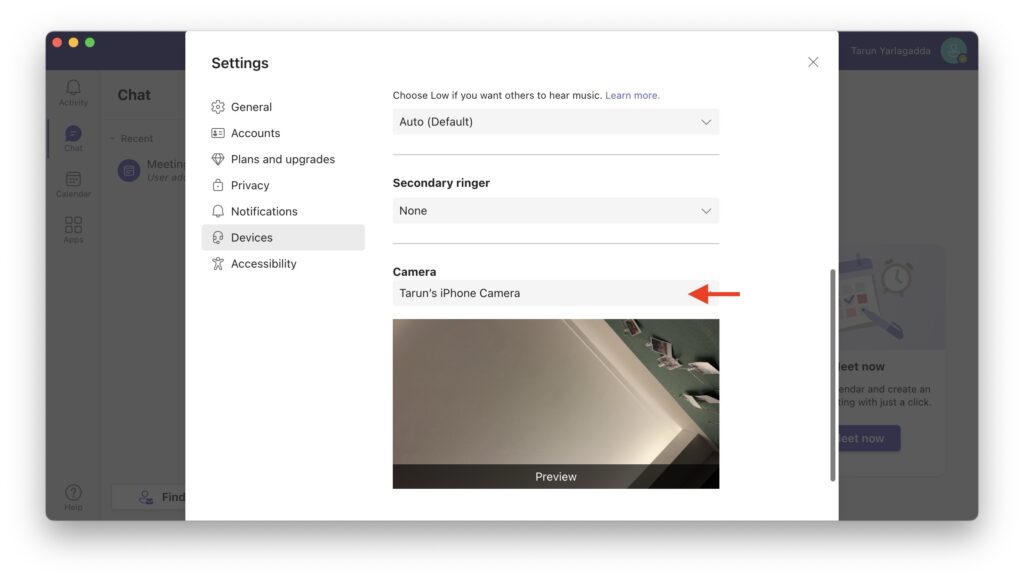
6. Lastly, select FaceTime HD Camera.
4. Allow Microsoft Teams to Use the Camera
If you’ve force-quit the Camera app and still can’t get it working or if the problem arose after you joined a meeting, Microsoft Teams likely doesn’t have permission to use the camera. When you first open the Microsoft Teams app on your Mac (or after you install it), you’ll typically be asked whether the app can access your camera. If you deny this permission by accident or if the prompt doesn’t appear at all, your camera won’t work in Teams.However, you can manually grant or deny these permissions by pulling up the Settings app on your Mac.
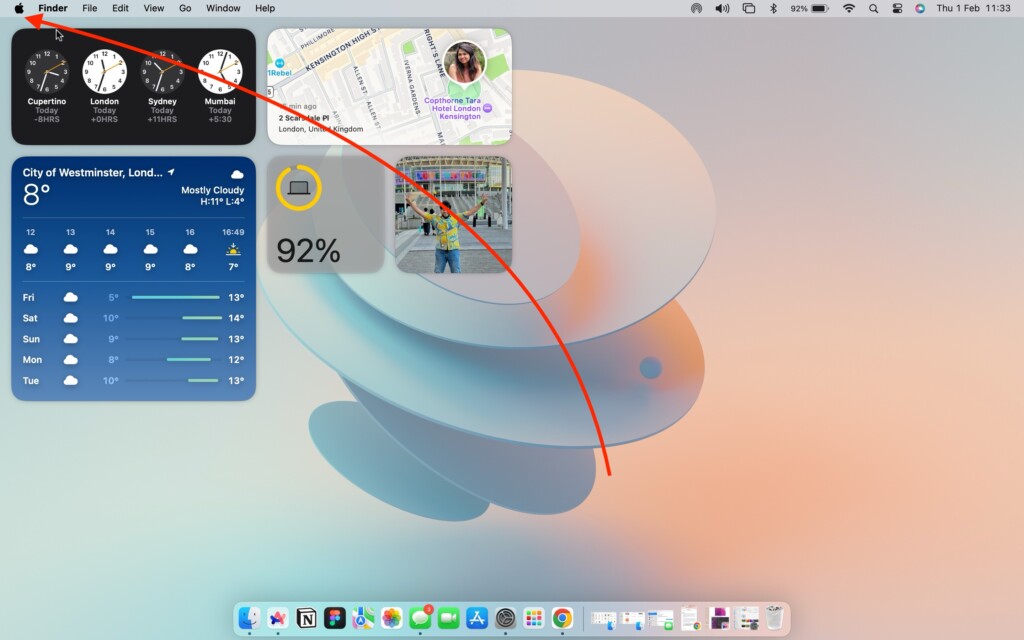
1. On the top left corner of your screen, click on the Apple icon .
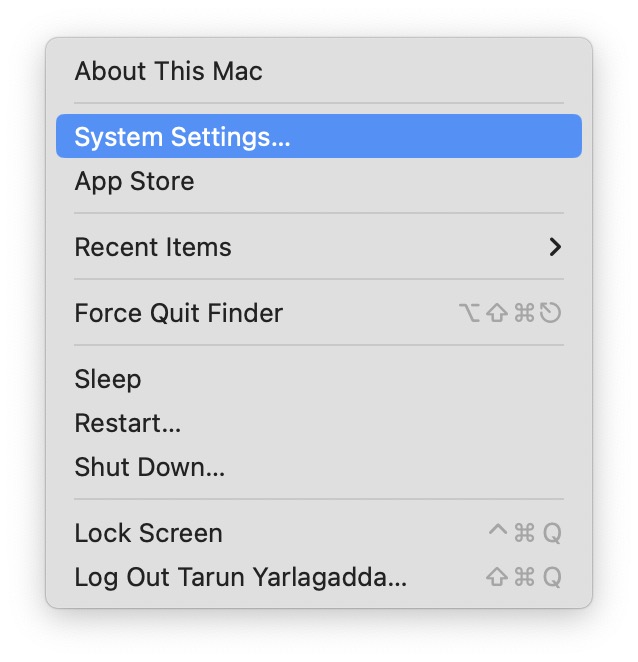
2. From here, click and open the System Settings.
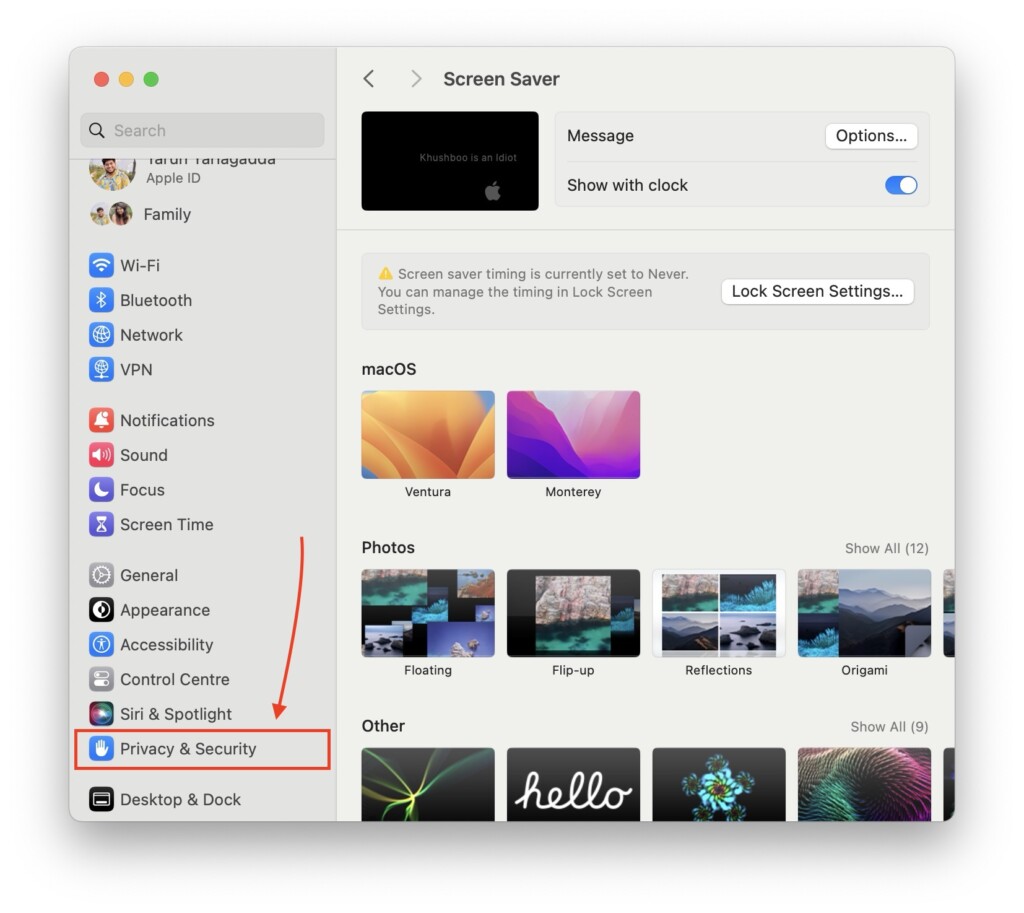
3. Once the System Settings app is open, scroll down a little and click on the Privacy & Security settings.
4. Next up, click and open the Camera settings.
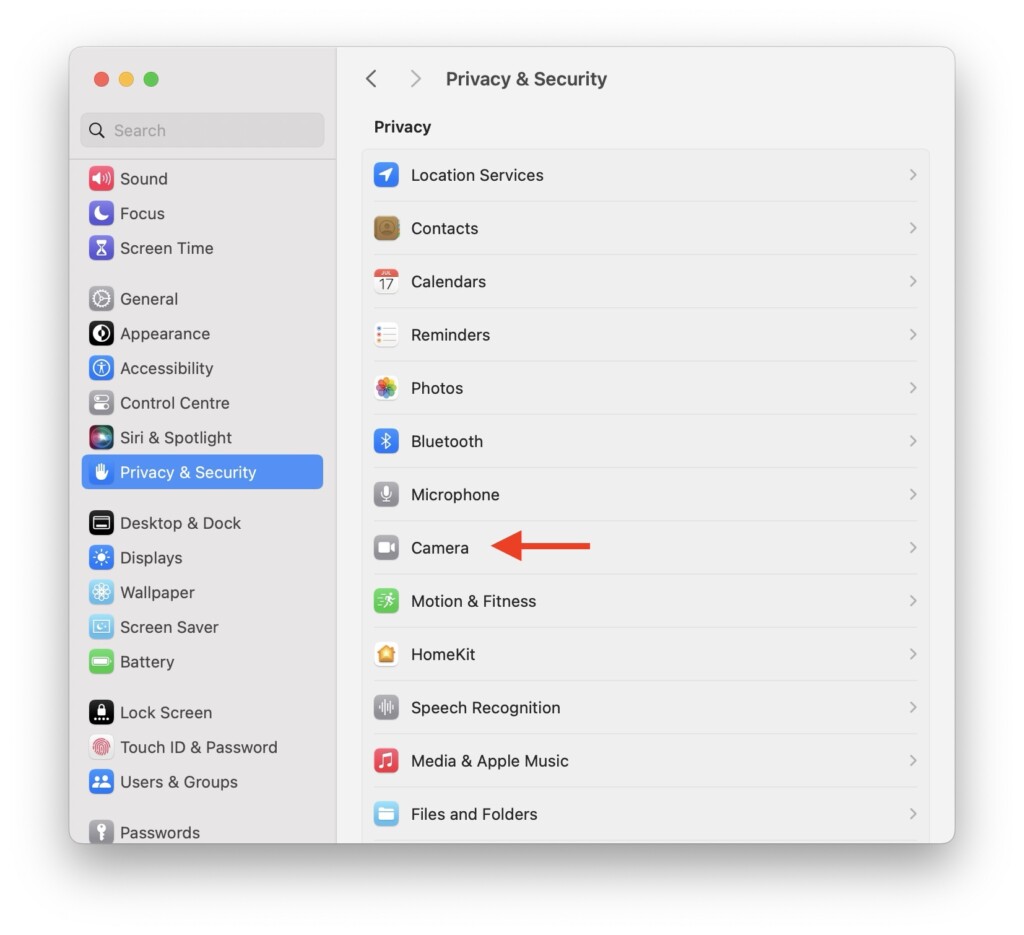
5. From here, turn on the toggle beside Microsoft Teams.
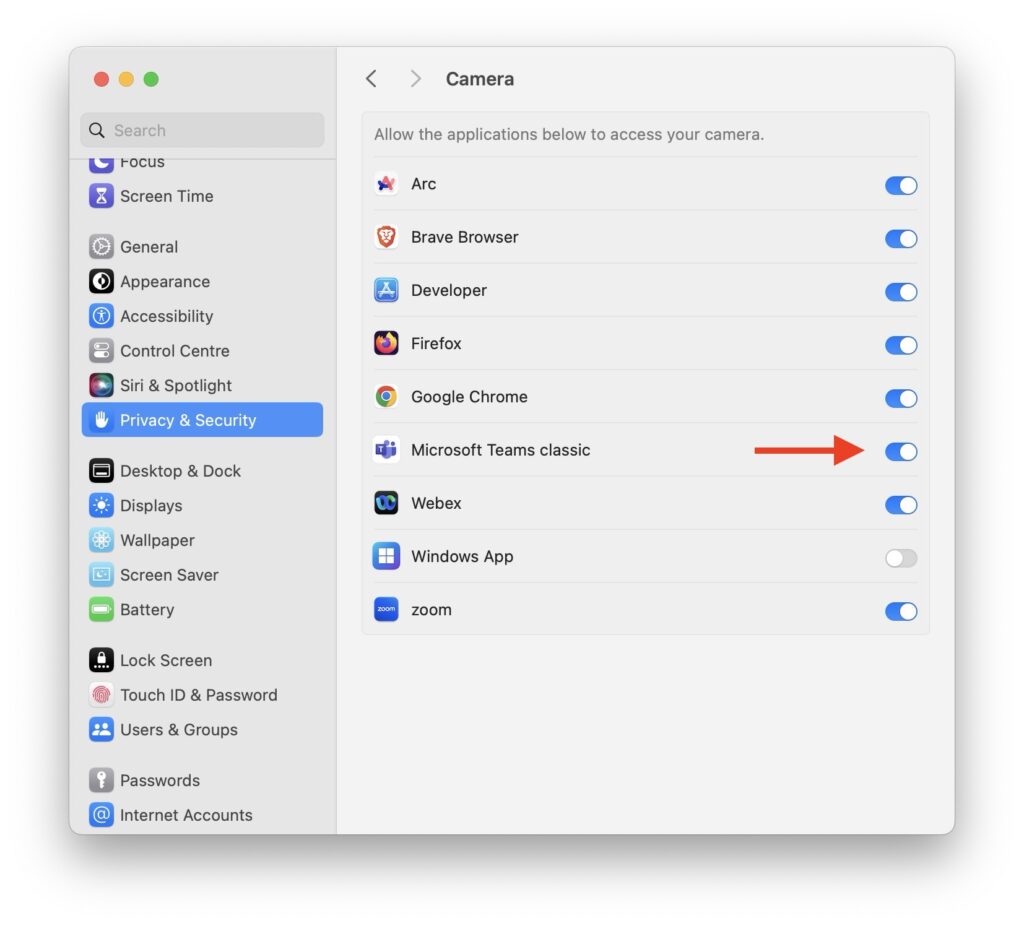
If, however, you’re trying to get the camera going in the web version of Microsoft Teams, the problem and solution are pretty similar. You need to give the browser permission to use the camera, not turn the camera on in the system settings on your Mac.
1. Open the Webex meeting on your browser.
2. Once you are in the meeting, if you are unable to access camera, click on the Site Settings icon.
3. From here, simply enable the camera.
5. Force Quit other apps using Camera
If you frequently join online meetings on your Mac, you might face “camera not working on Microsoft Teams” issue because your camera is being used by another app. This is a common mistake and I’ve been in this situation too. For example, let’s say you are on a Mac and you started a meeting on the Webex app. When you hit the start Webex meeting, the app takes control, uses your camera and microphone.
Now, if you change your mind and open the Microsoft Teams app, hop on and give someone a call, it won’t work because your camera is still being hogged by the Webex app. So for the camera to work, you need to close all other apps that you’d normally use the camera with, in order to let Microsoft Teams access to it.
1. On your Mac, click on the Apple icon found in the top left corner of your screen.

2. From here, open Force Quit.

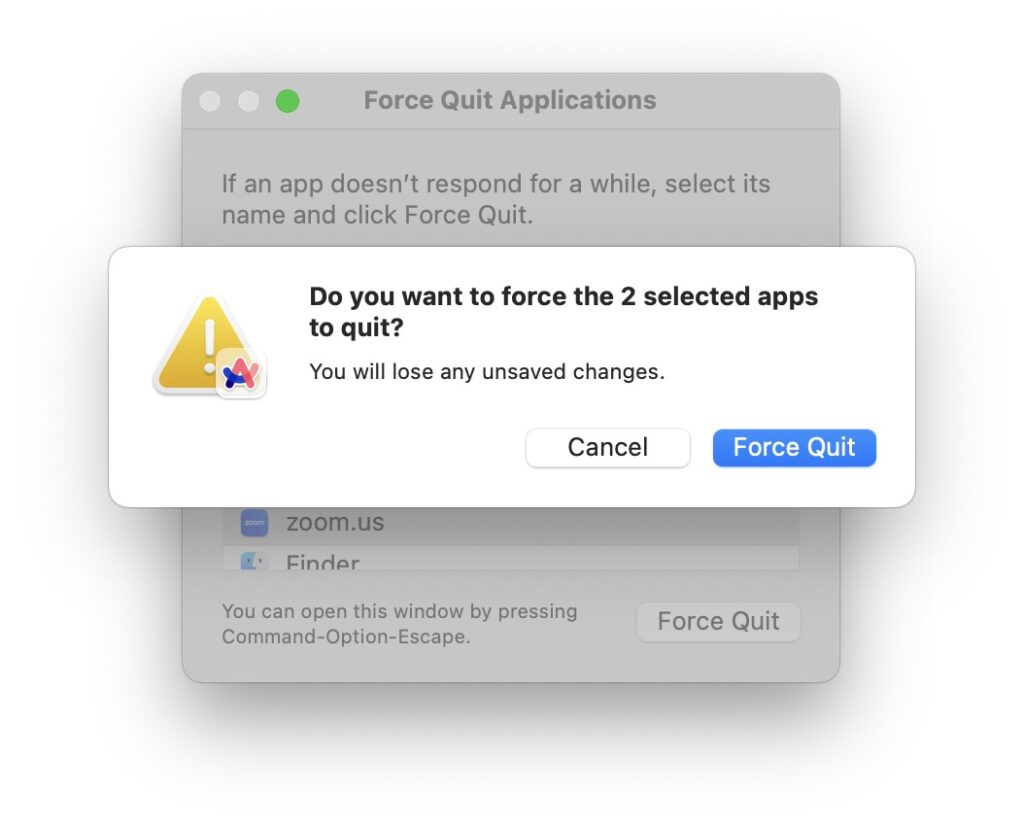
3. Next up, press and hold the cmd key and select all apps that use Camera except Microsoft Teams.
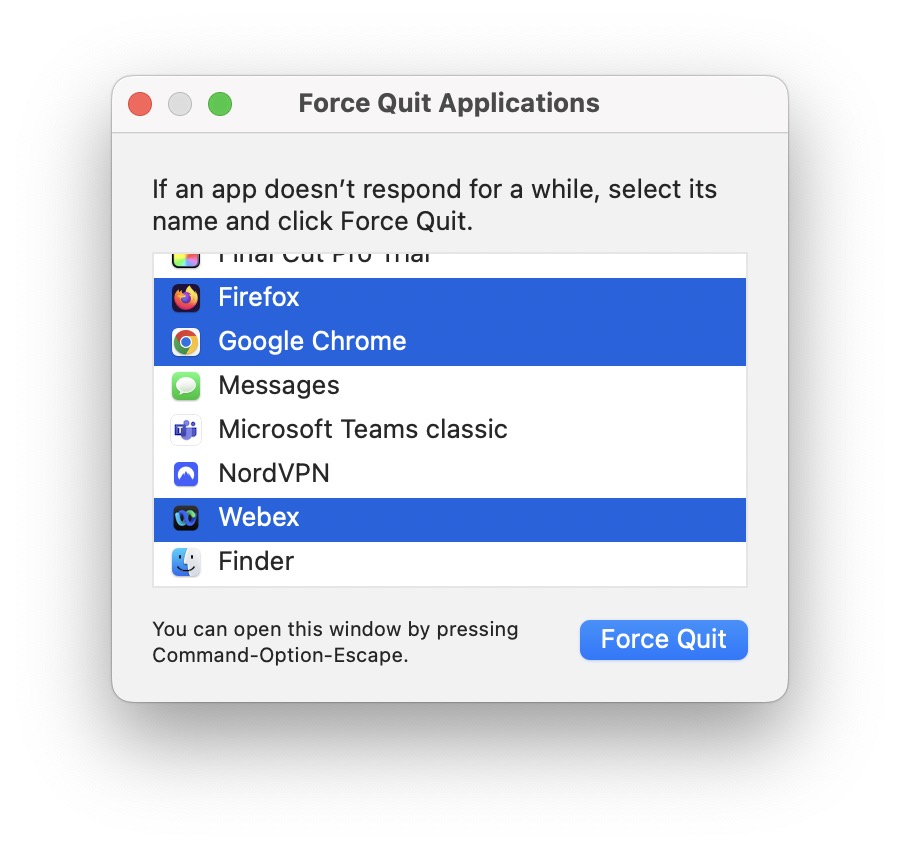
4. Now, simply click on the Force Quit button.
6. Uninstall and Reinstall Microsoft Teams
If you’ve tried all of the methods listed above to fix your camera issue in the Microsoft Teams app on your Mac, and the issue hasn’t been fixed, it’s time to bring out the big guns.
The final method to try is to uninstall and then reinstall the Microsoft Teams app on your Mac. Uninstalling and then reinstalling the Teams app clears out any potential issues that may have arisen from corrupted files or settings.
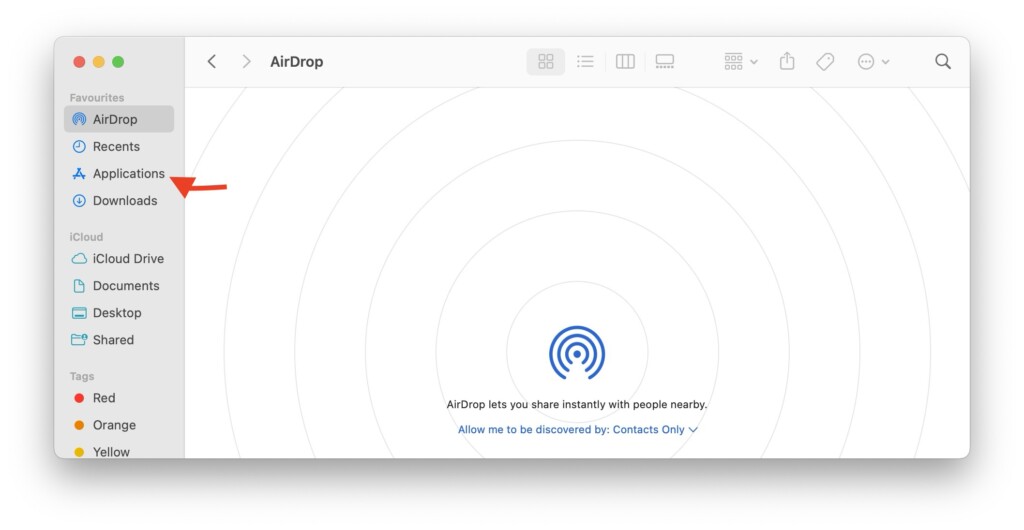
1. On your Mac, open the Finder app from the dock or Spotlight Search.
2. Once the Finder app is open, navigate to Applications.
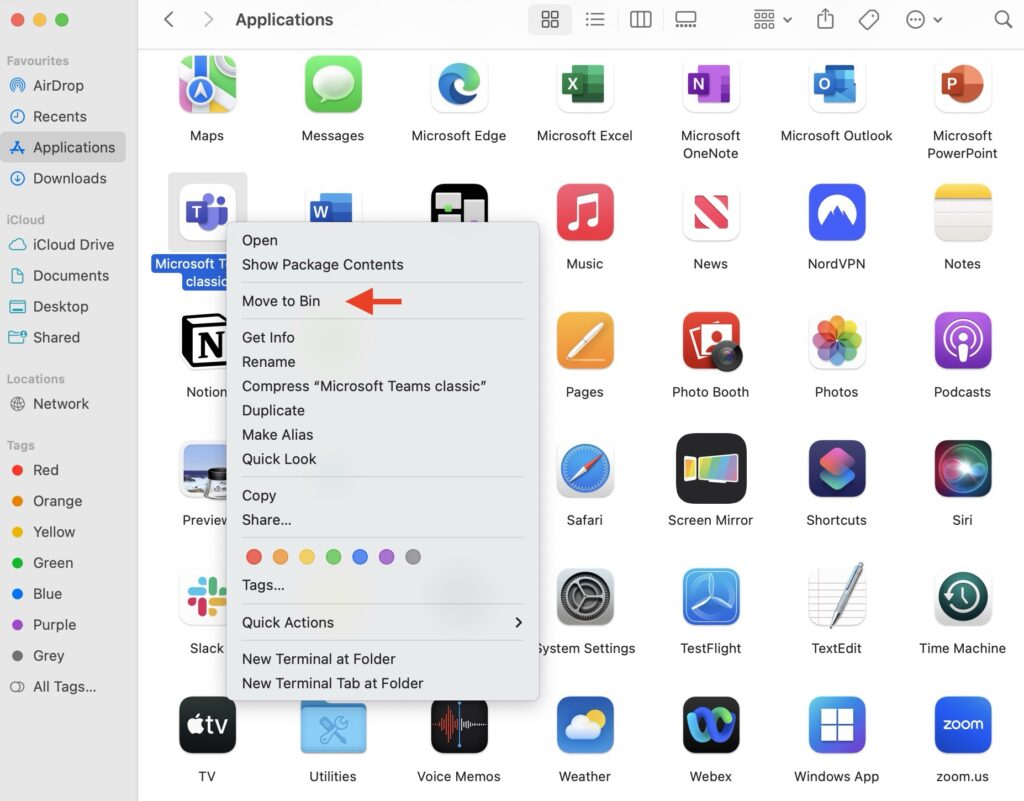
3. From here, find the Microsoft Teams app and right-click on it. Then click on Move to Bin.
4. Lastly, download and install the Microsoft Teams app.
Wrapping Up
We can now conclude this article on how to fix the camera not working in Microsoft Teams on your Mac. I hope that you were able to resolve the conflicts you have been experiencing with Microsoft Teams using these methods, both of which are easy to use and effective.
If one of these methods allowed you to resolve this problem with your camera, great job! For now, I hope that you will consider sharing this guide on your social media platforms to help your friends and family who might also be facing this problem. I think it’s about time for me to go. Thank you , I am always here to assist you. Any issues with your devices, you can read our guide. Until next time, Stay Techy!


